{tocify} $title={Table of Contents}
In this tutorial, we are going learn about the CSS Variable Definitions for Colors and Fonts that could be found at the top of the style sheet of a Blogger blog. The values for the Variable definitions can be modified directly through the Blogger Template Designer where are the settings for colors, backgrounds, fonts and font sizes.

Most default Blogger templates, such as the Minima Template, use these settings for the CSS, which makes it easier to modify the variables through the Blogger dashboard, using the Template Designer ("Template" > "Customize") editor and going to the "Advanced" section.

If the definitions are already added in the CSS, we'll be able to change the background colors, font colors, styles or sizes, directly from our Blogger dashboard without having to touch the HTML code of our template.
If these values are not set, we can define them by creating our own variables. The more variables are created, the greater will be the ease of changing colors and fonts of the Page Elements by going to the "Template Designer" and click on the "Advanced" tab.
In some cases, we can't change the color or font of a custom template if the designer has not implemented the variables and didn't defined & specified a particular value directly into a property. And if there is no definition for these values, we may not be able to customize it through the Blogger's Template Designer.
There are two types of variables:
1) Color Variable:

Please copy the below snippet and replace the names and types as you like, then paste the code below this comment:

Here, I have created a variable of type "color", with the "variablecolor" name. The color values (#DDF2FF) can be applied to all the borders of my blog and whenever I want to apply color styles to a specific border, I will type it like this:
Once we have created the variable, we can apply it on any property (not only borders) of any selector (page element) where it is possible applying the chosen color.
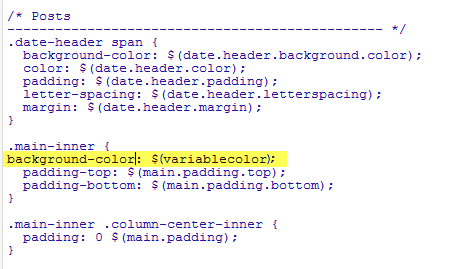
For example, if I want to add this color in the main-inner background (sidebar and posts area), I will add it just after the "main-inner" class selector, like this:

Now that a new variable has been added, save and return back to the blogger dashboard by clicking on the "Customize" button, then the "Advanced" tab. You will notice that there is a new variable called "Variable with light blue color". In order to change the color, just use the color picker tool.

Once the font variable has been implemented, we can add it to any property of any selector where we want to define this font style.
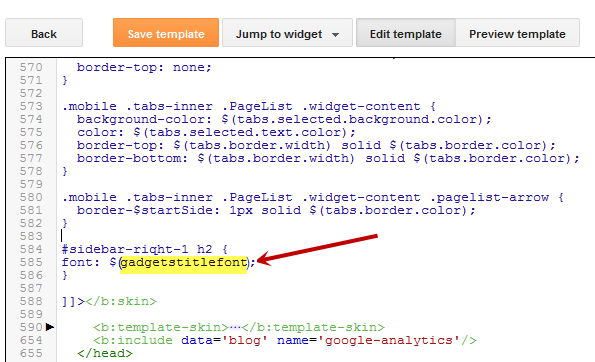
To define where this variable should be applied (which, in my example, is the title of the sidebar gadgets), I will need to include the values directly in the "h2" property of the "sidebar" selector (sidebar-right-1), by creating the following CSS rule:

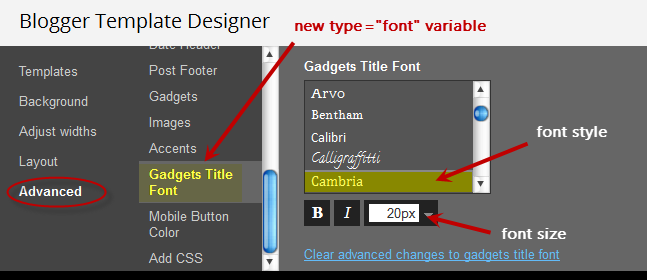
Now, that we have included a new variable, Save the template and return to the Blogger dashboard by clicking on the "Template" > "Customize" button and access the "Advanced" tab. Scroll down and we will see a new variable named "Gadgets Title Font" - if you want to change the font type or size, you can do it directly via this panel.

After you've decided what font style should be applied, click on the Apply to blog button on the right side.

As you work on your template design, you can add lots of color and font variable types, however, for other types of CSS attributes, it is not necessary to create variables. The other types, such as margin, padding, need to be included in the HTML of the template above the ]]></b:skin> tag. So that's how you can add custom variable definitions to Blogger. Enjoy!

Most default Blogger templates, such as the Minima Template, use these settings for the CSS, which makes it easier to modify the variables through the Blogger dashboard, using the Template Designer ("Template" > "Customize") editor and going to the "Advanced" section.

If the definitions are already added in the CSS, we'll be able to change the background colors, font colors, styles or sizes, directly from our Blogger dashboard without having to touch the HTML code of our template.
If these values are not set, we can define them by creating our own variables. The more variables are created, the greater will be the ease of changing colors and fonts of the Page Elements by going to the "Template Designer" and click on the "Advanced" tab.
In some cases, we can't change the color or font of a custom template if the designer has not implemented the variables and didn't defined & specified a particular value directly into a property. And if there is no definition for these values, we may not be able to customize it through the Blogger's Template Designer.
There are two types of variables:
1) Color Variable:
<Variable name="body.background.color" description="Outer Background" type="color" default="#66bbdd" value="#66bbdd"/>
- In red is the variable name. Here you can put any name you want, however, it must not contain spaces, that's why we may see some variable names using a dot "." between each word.
- In green is the description that will appear in the Fonts and Colors panel (it can contain spaces).
- In blue is variable type, which in this case is "color".
- In purple is the default value, which runs in the absence of any other value.
- In orange is the value of the selected color.
<Variable name="body.font" description="Font" type="font" default="normal normal 12px Arial, Tahoma, Helvetica, FreeSans, sans-serif" value="normal normal 12px Arial, Tahoma, Helvetica, FreeSans, sans-serif" />
- In red the variable name without spaces.
- In green the description of the variable, may contain spaces.
- In blue is the type of the variable, which in this case is font.
- In purple the default font.
- In orange is the font that you choose.
Where Are Variable Definitions located
We can find the variables definitions in the <head> section of our Template by accessing the HTML code (click on the "Edit HTML" button). There we should see a pair of <b:skin>..</b:skin> tags. The CSS style declarations will go in between those tags, along with the variable names.
How to Create Variables with type Color
Now, let's see how we can create type="color" variables in our template.Please copy the below snippet and replace the names and types as you like, then paste the code below this comment:
/* Variable definitionsCode to copy:
====================
<Variable name="NAME" description="DESCRIPTION" type="color" default="#xxxxxx" value="#xxxxxx" />For a better understanding, let's take a look at this example with variable of type "color":
<Variable name="variablecolor" description="Variable with light blue color" type="color" default="#DDF2FF" value="#DDF2FF" />

Here, I have created a variable of type "color", with the "variablecolor" name. The color values (#DDF2FF) can be applied to all the borders of my blog and whenever I want to apply color styles to a specific border, I will type it like this:
border: 1px solid $(variablecolor);Note that I have added the "$" symbol before the variable's name and included the name inside the parentheses. These should be added every time you want to implement a new variable definition.
Once we have created the variable, we can apply it on any property (not only borders) of any selector (page element) where it is possible applying the chosen color.
For example, if I want to add this color in the main-inner background (sidebar and posts area), I will add it just after the "main-inner" class selector, like this:
.main-inner {
background-color: $(variablecolor);
}

Now that a new variable has been added, save and return back to the blogger dashboard by clicking on the "Customize" button, then the "Advanced" tab. You will notice that there is a new variable called "Variable with light blue color". In order to change the color, just use the color picker tool.

How to Create Variables of type Font
Now let's say that I want to create a new variable of type="font" which I want to apply on the title of the sidebar gadgets. I will add it this way:<Variable name="gadgetstitlefont" description="Gadgets Title Font" type="font" default="normal normal 16px Arial,Verdana,'Trebuchet MS',Trebuchet,Sans-serif" value="normal normal 20px Cambria"/>In this variable that I just created, the default font to be searched by the web browser should be Arial, and in its absence, Verdana and so on. Otherwise, apply the Cambria font which is actually the font that we want and which can be easily changed by accessing the Blogger Template Designer.
Once the font variable has been implemented, we can add it to any property of any selector where we want to define this font style.
To define where this variable should be applied (which, in my example, is the title of the sidebar gadgets), I will need to include the values directly in the "h2" property of the "sidebar" selector (sidebar-right-1), by creating the following CSS rule:
#sidebar-right-1 h2 {And I will add this above the ]]></b:skin> tag of the Template (don't forget to add the "$" symbol before the variable's name, also put the name between the parentheses, otherwise it won't work).
font: $(gadgetstitlefont);
}

Now, that we have included a new variable, Save the template and return to the Blogger dashboard by clicking on the "Template" > "Customize" button and access the "Advanced" tab. Scroll down and we will see a new variable named "Gadgets Title Font" - if you want to change the font type or size, you can do it directly via this panel.

After you've decided what font style should be applied, click on the Apply to blog button on the right side.

As you work on your template design, you can add lots of color and font variable types, however, for other types of CSS attributes, it is not necessary to create variables. The other types, such as margin, padding, need to be included in the HTML of the template above the ]]></b:skin> tag. So that's how you can add custom variable definitions to Blogger. Enjoy!